Product Review: Tiki brand Colored Flame

Long time followers know that I have been seeking green flame for quite some time.

Latest in the list of products promising the solution is Tiki brand Colored Flame from Lamplight Farms.

Currently available at WalMart and Home Depot locations, so check your local stores.

The can comes with a most impressive list of warnings upon it, and the special tag attached to it.

From 2010 Buildup

The normal “caution flammable” (I would HOPE), and “don’t drink” (thank you idiots), and the surprising “contents under pressure”.

It comes with it’s own set of tweezers with which you are supposed to remove the wick.

From 2010 Buildup

Inside of the lid, there is a red cap.

From 2010 Buildup

The moment I touched this cap there was a release of pressure, and a small spray escaped from under the cap. You wouldn’t want to be doing this anywhere near eye level…

Now, my experience with the whole green flame quest has told me that the devil is in the wick. Wicks tend to have impurities that color the flame towards orange. The wick here is certainly unique, not the fiberglass I’ve seen other brands attempt to use.

From 2010 Buildup

However, The thing is crammed down TIGHT in the cannister. And, I busted the provided tweezers attempting to extricate the thing, but had pulled it out enough to get a grip on the thing with my fingers (ignoring the may cause irritation warning) to pull it out the rest of the way.

From 2010 Buildup

The cannister was enough of a different design I wanted to make sure my witch skulls would still fit, so forgive it being in the pics.

Initially there was some orange in the flame as the wick burned, but within 5 minutes, it had transitioned to be a nice green. As you can see, however, green flame gives off practically no light…

From 2010 Buildup

So, don’t expect them to light a way for you. You’ll need a secondary source of light to bring scenes into view.

From 2010 Buildup

But, I’ll have much more on how I plan to do THAT later.

________________________________________

The cannister listed average burn time as 4 hours, and the thing was indeed still burning 4 hours later. However, the flame had progressively gotten smaller throughout the burn. But the color seemed to get more ‘pure’ as time went on as well. Still, at the 4 hour mark it was still burning well, and was easily resisting the breeze with no signs of being blown out.

At the price tag of $5, this makes these among the cheapest solutions with a couple of caveats.

They are strictly one use only. Once you pop that red cap and pull the wick, there’s no putting the genie back in the bottle. They are also not refillable, and the fuel will evaporate quickly if left out and open. So, it’s 5 bucks each and every time you want to burn one.

However, the 4 hour burn time is better than many of the competitors as well.

For my personal use for a 3-4 hour haunt on Halloween, these are the perfect solution. If you are burning a lot more often, the refillable fuels will eventually catch up and be the cheaper solution. What that point is, you’ld have to do the math.

Colorflame.

Another little product review. (yes I’ve been shopping lately…)

Colorflame.

From Halloween buildup 09

Now, long time readers will know, I have had a long history of searching for a viable means of creating green flames for my torches. From shopping, to creating my own formula:

From Halloween buildup '08

So, it’s no surprise when I saw this stuff at the local grocer (of all places), I had to give some a try.

Now, the colorflame comes with a new wick, and 8 oz of fluid.

One immediately notes the short wick…

The instructions state that colorflame will only work with fiberglass wicks, and is best used with a new wick, and not mixing colors.

So, our first test was to put some of the purple colorflame into an empty oil candle in the bedroom. Since the oil candle has a smaller wick, I carefully cut the wick, which was actually a number of smaller wicks woven together, and removed one of the smaller ones, and inserted it into the oil candle.

Allowing to soak, we lit the wick. Well, we attempted to. Allowing to soak much longer than recommended by the instructions, it lit…into a small orange flame…

This is the same trouble I was having with my home brew. The brew would burn (insert color here) just fine, but add a wick, and orange is what you got. From the wicks themselves burning, I assume. Still, perhaps it was contamination from oil used in the candle years ago?

Tried it with the candle’s original wick. Same problem.

Undeterred, we grabbed a full size test.

Brand new Lamplight Farms replacement canister for a tiki torch. No chance of contaminating the fuel.

Results?

From Halloween buildup 09

Well, it’s KINDA green…

It’s actually more green in person, just won’t photo quite right.

From Halloween buildup 09

But, it’s nowhere near the homebrew’s pure, clean, GREEN.

From Halloween buildup '08

Color me unimpressed. (yes, bad puns abound…)

The fuel FEELS thicker than your standard lamp oil, and this may explain the apparent wicking problem. The short wick they provide, and the smaller canisters they SALE make me believe they are aware of the wicking, and have figured the maximum length into their kits.

Still, if you want the colorflame for a short (2 hour) use, it may well be worth the novelty.

For me, Green Fire will await my further refining of the home brew.

Happy Birthday to Fred…

Hope you all had a great 4th weekend.

We drug Fred around with us the afternoon of the 4th. My dad is helping design a means of mounting Fred up how we want, and needed some measurements, so I was just going to leave him over there for dad to fiddle with.

We get to my uncle’s place (right across the street from my parents) where the family BBQ is going on and unload Fred. Of course, my Uncle Rex wants to freak some folks out, so he goes to get some wire to tie Fred to the front of his trailer. I’m standing there holding him, and 2 kids are riding their bikes. The older races past, STARING at Fred and leaving his younger brother. Who sneaks by later…crying and refusing to even glance our way. And, while it was funny at the time, that I’ve already claimed my first victim of Halloween ’08….it also has me a little worried.

I really don’t want to be bringing kids to tears of fright. Jen says, he didn’t see Fred in context, and kids would be expecting scary things on Halloween. On the other hand, the kid didn’t see Fred in context. It was just me holding Fred in full daylight. Not Fred impaled on a 10′ pole in the dark, lit by firelight with the drums going and surrounded by skulls up on poles, and a little headhunter coming out of a hut with a spear (and glow bracelets).

Of course, then there’s my little cousin who reacts by holding Fred’s hand and singing him happy birthday. So, Fred’s birthday is now officially July 4th.

Friday night, with neighbors lighting the traditional little sparklers and stuff, and me sitting on some homebrew green fire fuel that is slowly evaporating, we did our own little demonstration, and poured it all into a little soda can, lit it, then dumped it into the street to make a big puddle of green flame. This inspired the neighbors to exclaim “whoa, there’s a green fire over there!”

As much as I’ld like to get that on Halloween, as posted earlier, it’s looking less likely.

Finally, I finished off Crystal Skull design #2.

I like the carved look. All the little facets, and how they catch the light…

More green fire news.

I’ve managed to track down several suppliers of the green fire. However, listed burn times would indicate a full canister of the oil would only burn for 3 hours, assuming my math is adding up right.

I think I’ll order a small sample to run a test myself. I do think I’ve managed to track down a source of wicks that will make it so my homemade brew will work, though. And, there’s always a plan B as well, with some granual additives that will work for the firepit and may or may not work for the torches.

We’ll keep you posted on any progress.

Some of you may have heard me lamenting on the lack of cheap torches out there this year. I need more, and I need to start replacing some of the old stock. And, thanks in part to a recall of some tiki torches that might have excess fuel *gasp* catch fire if it spilled onto the guard (fuel does tend to catch fire and all)forcing a redesign of the new torches. I’m patiently waiting for clearance sales, and will slowly convert my torches to the new canisters, just because that new clear bottle is rather nice.

However, I’ve come across what seems to be a trend that could threaten my ability to obtain even basic torch fuel this year. And, so, I’ve decided I may as well make a little public service announcement.

DONT DRINK THE TIKI TORCH OIL!

Seems there’s been a rash of folk mistaking the new Tiki brand oil bottles for apple juice. And, we’re talking ADULTS. Not kids here.

The bottles are “similar” and “you’ld have to look pretty hard” to tell the difference according to several stories.

So, I have taken it upon myself to make this handy little guide to tell whether your bottle is a Tiki Torch Oil, or Apple Juice.

1: Tiki Torch Oil comes with a child proof cap.

Apple Juice does not.

2: Tiki Torch Oil has a big TIKI brand logo that features FLAMES to dot the “I”.

Apple Juice typically has tree or apple based logo.

3: Tiki Torch Oil has a big PICTURE OF A BURNING TORCH on it.

Apple Juice has a PICTURE OF APPLES.

4: The Back of a Tiki Torch Bottle has a “DANGER: May be harmful or fatal if swallowed” warning.

The Back of an Apple Juice bottle has nutritional values on it.

5: Tiki Torch Oil smells like Citronella

Apple Juice smells like…apple juice.

And finally, while I can’t exactly say what Tiki Torch Oil might TASTE like, but if that apple juice tastes a little funny, just spit it out to be safe, eh?

I really don’t need a recall of all oil taking it off the shelves…

More experimentations…

There’s always some little test going on at the house.

The green fire is coming along nicely.

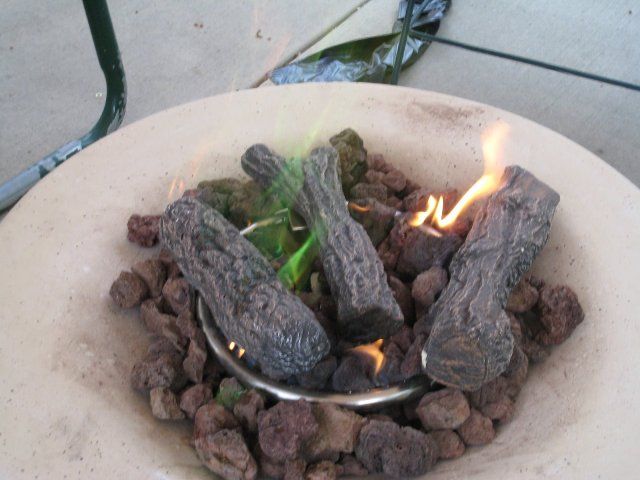
I still need to figure some way of making it renewable. Soaking paper in the solution burned up too quick and was overpowered by the orange flames too quick. The next idea comes in the form of soaking wood chips.

Half-assed soaking of a lava rock gave a satisfying green burn for a surprising length. But, as it does not get consumed, it’s really not plausible to keep piling on more and more rocks…

The second experiment will likely begin this evening.

As spoken of previously, we’re looking for a means to make some nice suitable clothing for Fred. And, the first trial there was based on following the tutorial linked to over in the how-to section on the sidebar.

However, I’m a little wary of the fact that I don’t really have the pond water specified, and it may not rot quite as well.

Then, when looking up info on my grasses, I found this tutorial on clearing out grass for a flowerbed.

Sheet composting. Specifically the following section caught my attention.

“Sheet composting under a tarp works because the tarp traps both moisture and heat. Hot, dark moisture is one of the very best conditions for rotting.”

Hmmmm….that sounds aweful usefull…

Since we’re clearing a section of the backyard for a patio anyway, I may as well run a couple tests. I’m going to grab some more clothes, and run a test on what I belive will be the best depth for this rotting of the clothes. But, I also have a bunch of pants of Alec’s that no longer fit and have holes in the knees. We’ll place them at varying depths for testing purposes.

So, come fall, I’ll have 2 sets of clothes for Fred, and a bunch of pants. I’m sure we’ll have a difinitive answer as to the best means of rotting clothes by then.

And just who is this Fred I keep mentioning?

He’s been hanging out in the garage for a while now. Needs lots of work still. If you get the joke with the name, good for you. If not, you’re not missing anything.

Then, we have the Crystal Skull experiment going on in the garage…

This is THE most insane mold I’ve ever tried. If it works, it’s likely to be the only full size one I make, just from cost of the acrylic resin. But, here’s the redneck mother mold in all it’s glory…

And finally…

I was in Michaels this last weekend, getting the aforementioned acrylic resin. I always check the Model Magic just in case it’s on super special price or something. And, there on the shelf next to it was this “new” tag, and a bucket of Crayola Air Dry Clay. The stuff was much cheaper than other airdry clays, so I picked up the small tub.

First test, I just rolled a coil and let it dry overnight. It was pretty solid in the morning, but not completely dry. Jen tossed it out, and I can’t blame her for thinking it was just trash.

The second test was using it to add in a bit on a new model for yet another mold I’m making. Adhered great, pleasure working with it, but thinner portions cracked. Fortunately, the model in question, cracks just will add to the end item.

Now, the stuff is superior to model magic in that it’s cheaper, dries stronger, and tools and works like a traditional clay. However, it is a touch heavier when dried, and more prone to cracks, and might shrink a tad more.

Meanwhile I look at my ole powergrab. Needs a base to apply onto, cannot sculpt from the ground up. Strong and flexible…

The wheels are turning…Clay + power grab kneeded together….hmmmm….results coming soon…