Yet more Power Grab

It’s rather strange, really.

Years ago, I needed to just add a little ridge to make that pelvis bone fit my head. Standing there in the hardware store staring at epoxy’s, glues, and caulk, Power Grab caught my eye, mostly because I had no caulking gun at the time, and it came in pressurized canisters…

Now, it’s become integral. From sculpting masks, to Paper Mache, we use the heck out of the stuff. To my knowledge, I’m about the only one out there really sculpting with the stuff, as well. Well, the blog does have unorthodox in the title…

Strong points of Power Grab being:

relatively high tack (though I’m not buying the commercial for a second)
Water cleanup
EASY manipulation
repositionable if you mess up
somewhat flexible when dry

Some weaknesses include:

It shrinks slightly when drying
can crack
Does not like freezing (while wet)
And it’s somewhat flexible when dry. (the higher the humidity, seems the more flexible it is. Have had some things tend to drift out of alignment if left for long periods in high humidity.)

We’ve learned, adapted, and come to love the stuff for both the strengths and weaknesses.

So, it should be no surprise that when it came to Bob’s forearms and hands, I’m relying on the old standby.

Cutting a quick and dirty template out of cardboard for the forearm, we arranged some pieces of wire hangers to make the fingers.

From bob

Of course, I needed “help”

From bob

Just squeeze out a little power grab into place, wet fingers, and smooth it out. Just getting a basic attachement at this point, we’ll mache the thing for the actual form later.

From bob

I did mention the water cleanup, right? It’s REAL simple to clean up while wet. Soooooo…I had ‘help’…

From bob

Rinse some hands, wash some table…

Anyhow, after about 2 hours under the cieling fan, they were dry enough to peel away from the plastic.

From bob

Currently, we’re out of Power Grab. Gotta run grab some more, then we’ll mache these suckers, make the hands, and attach the forearms. THEN we are ready to paint and corpse the torso, while starting on the legs.

Shoulders…

It has really been an interesting experience working on Bob…

One comes to appreciate just how complex the design of a skeleton actually is.

This evening, we attached the shoulders. An interesting bit of technical difficulty there.

The collar bone, shoulder blades, and humorous were all constructed of simple paper mache. But, to attach them, we have gone with full strength power grab. (remember, our paper mache recipe is based on power grab) I didn’t want the shoulders hinged for Bob, but that would have been a simple matter. We’ll get into that more when we do the forearms.

In case you were wondering, Bob here has, thus far, taken 1/2 a batch of the paper mache glue, and about a sunday paper’s worth of paper.

The high tack of the power grab enabling us to just slap the things in place with no reinfforcement. It will dry rock solid. And, the only thing we’ve done is prop the 2 humorous in place while it all dries.

From bob

Couple forearms, couple hands, and skulpting a skull, it might just turn out alright. Then we can corpsify it.

From bob

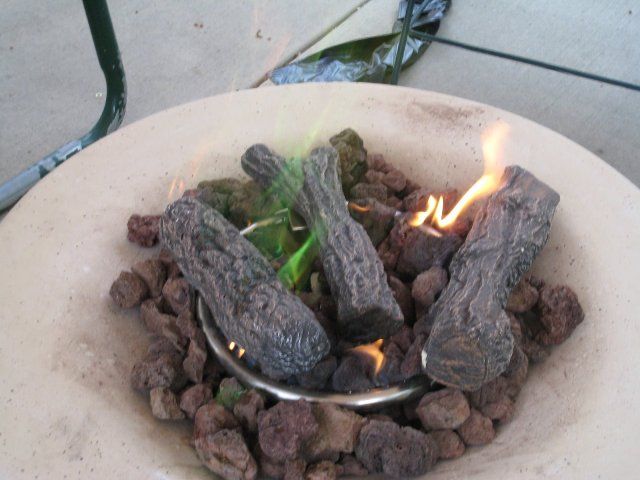
In some other news, for a planned project for next year, we found a little ‘table top fire bowl’ on sale at Wal-Mart.

It uses those 16oz propane bottles, and it’s all nice compact, and enclosed.

From Halloween buildup 09

I need another, possible 2 or 3. But, they are not exactly flying off the shelves at the sale price. And, only 1 local Wal Mart has started that sale price so far. I’m really not surprised. It’s not much of an actual firebowl…tiny little thing. So, we’re going to keep an eye on the stock levels, and watch the price points for now.

The Doldrums

I’ve got a case of being in the doldrums lately.

I’m having a difficult time getting motivated.

See, Bob’s reason for being is currently in limbo. There just may not be a classroom to make the lab for this year.

Oh, I’ll still finish it up, and maybe do the lab at the house one year.

BUT, it’s been difficult to get fired up when folks might not even see it this year.

There is the Charr effigy to work on, but the weather has been just sour enough to make it risky to work on that thing outside. Rain every other day here. Oh, just a sprinkle. Enough to be problematic…

So…we’ve been playing a bit. Swimming, Lagoon, playstation…not Halloween.

I did stumble upon an interesting cartoon the other day.

Oh, ignore the political message and watch the snake oil salesman.

I’m telling you…a whole medicine show setup would be a complete riot for a haunt.

And, my wife got a new camera for her birthday. And, got us an upgraded video of Dracula’s Castle.

And a video of the Terror Ride.

(She had the same problem as me on the Terror Ride, it’s changed too much since we last went, we’ll get a better video another time after I get a good feel for how to film it.)

And, the most precious look on Alec’s face at 0:40

OLD, OLD WOODEN roller coaster, that.

________________________________

I’ve been rumbling around some new and exciting ideas in my mind as well. Not sure exactly how to bring them to fruition quite yet.

But, we’ll come up with something.

________________________________

The wierdo grass that may or may not be correct seems to have taken root fine. I’m still skeptical…

And, most of the stuff planted last year is thriving now. Even the Karl Forester grass looks like it will hit 6′ high this year. We should be able to show you WHY I picked the stuff out this year.

Colorflame.

Another little product review. (yes I’ve been shopping lately…)

Colorflame.

From Halloween buildup 09

Now, long time readers will know, I have had a long history of searching for a viable means of creating green flames for my torches. From shopping, to creating my own formula:

From Halloween buildup '08

So, it’s no surprise when I saw this stuff at the local grocer (of all places), I had to give some a try.

Now, the colorflame comes with a new wick, and 8 oz of fluid.

One immediately notes the short wick…

The instructions state that colorflame will only work with fiberglass wicks, and is best used with a new wick, and not mixing colors.

So, our first test was to put some of the purple colorflame into an empty oil candle in the bedroom. Since the oil candle has a smaller wick, I carefully cut the wick, which was actually a number of smaller wicks woven together, and removed one of the smaller ones, and inserted it into the oil candle.

Allowing to soak, we lit the wick. Well, we attempted to. Allowing to soak much longer than recommended by the instructions, it lit…into a small orange flame…

This is the same trouble I was having with my home brew. The brew would burn (insert color here) just fine, but add a wick, and orange is what you got. From the wicks themselves burning, I assume. Still, perhaps it was contamination from oil used in the candle years ago?

Tried it with the candle’s original wick. Same problem.

Undeterred, we grabbed a full size test.

Brand new Lamplight Farms replacement canister for a tiki torch. No chance of contaminating the fuel.

Results?

From Halloween buildup 09

Well, it’s KINDA green…

It’s actually more green in person, just won’t photo quite right.

From Halloween buildup 09

But, it’s nowhere near the homebrew’s pure, clean, GREEN.

From Halloween buildup '08

Color me unimpressed. (yes, bad puns abound…)

The fuel FEELS thicker than your standard lamp oil, and this may explain the apparent wicking problem. The short wick they provide, and the smaller canisters they SALE make me believe they are aware of the wicking, and have figured the maximum length into their kits.

Still, if you want the colorflame for a short (2 hour) use, it may well be worth the novelty.

For me, Green Fire will await my further refining of the home brew.

The Island King: 2009 redesign

It was brought to my attention that Lamplight Farms has redesigned the Island King Tiki Torch in 2009.

As such, my little review there is out of date. So, we set out and purchased one of the 2009 Island King Tiki Torches this weekend.

From Halloween buildup 09

Gone is the 3 piece pole that so troubled me with the 2008 version. Single piece construction makes for a much sturdier and hassle free pole.

Also new, the canister now sits directly on top of the pole. In 2008, the canister was offset.

From

I have no doubt this was done for safety measures, as the directions state, there are 3 means of securing your Island King.

1. Use a Tiki brand torch stake
2. Use a Tiki brand torch stand
3. Bury at least 8″ in the ground.

Only makes sense that the pole is more sturdy with the weight centered on the pole.

Ironically, however, there is now no pole to strike to achieve those 8″ to bury the thing. I can’t exacty fault them for attempting to push those stakes and stands on us. Good business sense, if annoying…

The canister itself seems to be a touch on the flimsy side. In fact, I visited 3 Wal-Marts looking at these. The first Wal-Mart contained no Island King Torches that were undamaged. Presumably during shipment and handling. The second Wal-Mart had mostly intact torches, but I decided it unwise to attempt to cram one into my little car. The third (closest to home with the bigger vehicle) had a mix of damaged and undamaged.

2 points seem to absorb the damage. The decorative wind break at the top, and, more concerning, the area where the canister attaches to the pole.

From left to right: 2009 Island King ($15), 2008 Island King ($20), $2 Tiki Torch

From Halloween buildup 09

As mentioning last time, to get the most of your Island King out of the box, er, wrap, as it is now, you need to modify that pristine wick.

From Halloween buildup 09

Cut those outside strings, and fan it out just a bit to make it look like the natural wear a wick receives.

From Halloween buildup 09

The 2009 redesign does have a slightly smaller canister than 2008, but if there is any less capacity, it was imperceptible to me when filling and carrying. And, that smaller size does not appear to affect the performance.

Again, from left to right: 2009 Island King ($15), 2008 Island King ($20), $2 Tiki Torch

From Halloween buildup 09

Out of curiosity, I placed my ‘mini island king’ modification, an unintended side effect of the witch skulls, on the $2 torch.

From Halloween buildup 09

So, what’s the verdict?

Finding some undamaged Island Kings might be a challenge, and there would be the concern of damage occuring during storage. The cheaper cost is certainly attractive, and if you find them on clearance, all the better. But, is it worth 7X the cost of a regular torch? Well, that’s up to you.

Edit: I was in Home Depot checking out some different torches someone had pointed me at, and I noticed the Home Depot version of the 2009 Island King Tiki Torch STILL comes with the 4 piece pole in a box, but it now screws into the BASE of the canister, much like the WalMart version. I’m not shelling out $15 to see if the pole connections have been improved, but the CANISTER appeared to be of a higher quality than the WalMart cansiters, feeling a tad more durable. The boxes sure prevented shipping damage MUCH better as well. The Island Kings there were in pristine condition.